The purpose of this (Standard Operating Procedure) SOP For Preventive Maintenance of Terminal Sterilizer is to provide guidelines and instructions for the preventive maintenance of the Terminal Sterilizer to ensure its optimal performance, reliability, and compliance with sterilization standards.
SOP For Preventive Maintenance of Terminal Sterilizer
- OBJECTIVE:
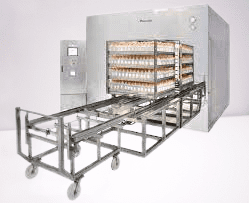
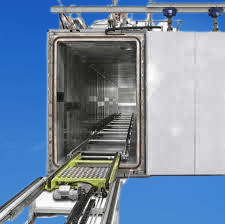
- This SOP is describing the Preventive Maintenance procedure of Terminal Sterilizer installed in production department .
- SCOPE:
- This SOP is applicable for Preventive Maintenance of Terminal Sterilizer installed at the Production department.
- RESPONSIBILITY:
- Technician/ Operator shall be responsible for proper execution of preventive maintenance as per SOP.
- Engineering – Head shall be responsible for reviewing the SOP and for ensuring proper execution of preventive maintenance.
- ACCOUNTABILITY:
- Engineering – Head shall be accountable for proper implementation of the SOP.
- DEFINITIONS:
- Nil
- PROCEDURE:
- Preventive maintenance shall be executed as per the SOP No.: SOP/EN/XXXYYY – Execution of Preventive Maintenance.
- Ensure that the spare parts are available at the time of preventive maintenance.
- Preventive Maintenance – Mechanical
- Clean the chamber drain strainer
- Remove guides, shelves and loose plates & clean the chamber internally.
- A non-choleric cleaner should be used. Stubborn scouring powder or chrome cleaner should be used occasionally. Sterilizers frequently used for sterilization of choleric solutions demand thorough cleaning as residuals may cause serious corrosion even in stainless materials. An Actifed cleaner is best suited for this purpose. Thorough rinsing is however essential.
- NOTE: STEEL WOOL MUST NEVER BE USED
- Clean the chamber surface with an organic solvent such as trichloroethylene or similar. An ordinary house hold cleaner is also good for the purpose. Protect lacquered surfaces, texts and plastic articles from contact with solvents
- Check the door closing motion is Smooth.
- Check the air in filter for tight and rigid attachment.
- Clean and lubricate the door gasket. Replace the gasket if it becomes hard or is cracked, damaged, deform, shape and size is changed.
- The replacement of gasket will be as per following procedure
- Remove the door gasket from the groove.
- Remove the spring from the groove.
- Clean the Groove, Spring & Gasket with Isopropyl Alcohol (IPA) thoroughly.
- Apply food grade lubricant in the Groove, on spring.
- Put the Spring in the Groove.
- Apply food grade lubricant on the Gasket.
- Put the Gasket in the Groove by pushing it slowly.
- Verify the vacuum leak test.
- Frequency schedule on monthly basis.
- Check the printer.
- Check the recording instrument for proper prints. Replace the ink cartridge if necessary.
- Frequency of checking shall be after every three months.
- Check the chamber safety valve.
- Check the chamber safety valve by following procedure.
- Close both the doors.
- Switch on the Chamber steam in valve; let the chamber pressure increase above pressure set on safety valve.
- Steam should start coming from the safety valve outlet at set pressure.
- If the safety valve does not operate at set pressure then re-set it at required pressure.
- Check the safety valve as per new setting. If the safety valve doesn’t operate, then replace it with a new one.
- Checking shall be done Quarterly.
- Check the Jacket safety valve.
- Switch on the Jacket steam in valve; let the Jacket pressure increase above pressure set on safety valve.
- Steam should start coming from the safety valve outlet at set pressure.
- If the safety valve does not operate at set pressure then re-set it at required pressure.
- Check the safety valve as per new setting. If the safety valve doesn’t operate, then replace it with a new one.
- Insert the spring and then gasket in the gasket groove.
- Checking shall be done Quarterly.
- Checking of Vacuum Pump
- Check the rubber spider of the coupling for any damage, replace if required.
- Check the alignment of motor and pump. Rectify / adjust it if required.
- Check the vacuum pump for water leakages, if leakages are observed rectify the same.
- Check Oil level of FRL.
- Checking shall be quarterly.
- Checking of leakages
- Check for any leakage of water from pipe fittings (Valves, strainer NRV etc.) and connectors.
- If any leakage is observed, check O-rings, gaskets, diaphragm and replace if found damaged OR worn out.
- Check all the clamps and tighten them if required.
- Check the leakages from pumps at its inlet and outlet port, if any leakage is observed arrest the same by providing new gasket and tightening the line connectors.
- Checking shall be done Quarterly.
- Checking of pneumatic tubes and connectors
- Physically check for any damage/leak, deformations is observed, replace the tube/connector.
- Checking shall be done Quarterly.
- Checking / cleaning of steam traps.
- Open the tri-clover clamp and remove the steam trap from the drain line of chamber.
- Open the cover nut and remove the float ball out and clean it with potable water.
- Reassemble the steam trap.
- Checking shall be done six monthly
- Checking / cleaning of spray nozzles.
- Open the tri-clover clamp and remove the spray nozzle.
- Check the spray nozzles for proper functioning.
- Check and clean the spray nozzle.
- Checking shall be done six monthly.
- Replacement of vacuum pump bearing.
- Remove the end plate of vacuum pump.
- Open the vacuum pump housing. Take out the impeller shaft from bearing housings.
- Replace the inner race of bearing on the shaft.
- Replace the outer race of bearing. Fill up all-purpose extreme pressure, high temperature grease in the bearing housing.
- Fix the end plates and tighten.
- Replacement of vacuum pump bearing shall be done yearly.
- Replace the vacuum break filter cartridge & Compressed/ Process air filter cartridge once in year.
- Recommended/Identical lubricants for the various parts of the sterilizer
- Door Gasket
- Lubricant Details:
- Make :
- Model :
- Viscosity :
- Type : Wash Proof Bearing Gel
- List of faults and remedial action.
| FAULT | REMEDY |
| Steam Pressure inside the jacket does not rise up to 1.2 kg/cm2 (g) or 2.2 kg/cm2 (g) | Check steam trapCheck incoming steam utility |
| Control “ON” indication does not glow | Check incoming electric supply.Check Mains isolator.Check Fuse as per ‘Electric Wiring Diagram’. |
| Door not closing (Movement Only) | Check Compressed air supply. Ensure Pressure is above specified limits.Check solenoid valves. Check Pneumatic cylinder. |
| Gasket not pressurizing | Check Compressed air supply. Ensure Pressure is above specified limits.Check whether limit switch LS1/LS2 is activated.Check solenoid valve. Check Pressure Setting on Pressure switch.Clean & Lubricate the Gasket Groove.Check the gasket for any damages. |
| Door Gasket not retracting | Check compressed Air Supply. Check solenoid Valve. Check setting on Vacuum switch. Clean & Lubricate Gasket Groove as detailed in.Check the gasket for any damages. |
| Door not opening (Movement only) | Check Compressed air supply. Ensure Pressure is above specified limits.Check solenoid valves. Check Pneumatic Cylinder. |
| Unloading/Loading door close PB pressed gasket comes out | Check the door close Limit Switch whether it has got stuck by pressing it 2 to 3 times. |
| Door not closing properly, gets stuck in between | 1. Check the incoming compressed air pressure (range should be 6 to 7 kg/cm2 (g) 2. Adjust the blue color flow control valve located at the bottom/door opening end of door operating cylinder 3. Check for proper retraction of gasket |
| Door bangs on closing or opening end | Adjust the blue color flow control valve located at the bottom/door opening end of door operating cylinder |
| Door locking cylinder not releasing | 1. Check the pneumatic tubing 2. Check the pneumatic pressure 3. Check whether the cylinder stroke passes Through the hole of locking plate welded on door bottom side 4. Check for any leakage in door cylinder |
| Door movement is not smooth | 1. Check the incoming compressed air pressure (range should be 6 to 7 kg/cm2 (g) 2. Check the door component alignments 3. Check the door surface 4. Check for proper retraction of gasket |
| Process does not start | Check whether all pre conditions are fulfilledCheck input status as per process I/O DiagramCheck whether emergency stop switch is actuated. |
| Operator Interface does not indicate temperature or indicates it as “Zero” or very high. | Check the wiring connectionsCheck RTDCheck D.C source outputCheck temperature transmitter outputIf any of the components is faulty replace the same. |
| Operator interface does not indicate pressure. | Check the wiring connections.Check Pressure transmitter output. Check D.C source output.If the component is faulty replace the same. |
| Process not getting aborted. | Check aborts Key switch contacts.Check the related wiring. |
| Vacuum not being created in chamber. | Check water supply flow rate pressure to vacuum pump.Check vacuum pump as described in attached maintenance manual. Check parameter for vacuum level in MMI.Check all piping connections. |
| Temp / Pressure not building up in chamber. | Check steam supply – Pressure flow rate as specified.Check the condensate Line for any blockages.Check the setting of condensate needle wall. |
| Sterilization Temperature not achieved even after Pressure has attained pre determined value in the chamber. | Check the condensate Line for any blockages. 2. Check the setting of condensate needle wall. |
| Temperature Overshoot in chamber. | Check the condensate Line for any blockages.Check the setting of condensate needle wall.Check the incoming steam pressure. It should not go above the required pressure. |
| Time for Vacuum break too long. | Check filters air inlet line.Check the filter cartridge |
| Pre conditions not fulfilled. | Check closing of door & pressurization of gasket.Check the working conditions of indicationCheck the gasket pressurization pressure switch operation |
| Vacuum pump not starting. | Check fuse as per Electrical wiring diagram.Check overload relays if required set it.Check the PLC out put |
| Operator interface is blanked off | Check interlinking cableCheck for proper earthing |
| Indication (s) illuminated (Dim) when not required. | Check phase & neutral contact for reverse connection. |
| If any valve is not operating | Check the related fuse as per the wiring diagramCheck for jamming of valve check nut. |
- Check the stock for the recommended spare part list as follows
- Checking of stock for recommended spare list; checking frequency shall be quarterly
| SR. NO. | DESCRIPTION | QUANTITY |
| 1. | Door Gasket | 1 Set |
| 2. | Pressure Switch | 1 No. |
| 3. | Vacuum Switch | 1 No. |
| 4. | R.T.D. Sensors PT – 100 | 3 Nos. |
| 5. | Solenoid Coils | 3 Nos. |
| 6. | Papers for Strip Chart Recorder | 25 Nos. |
| 7. | Ink Cartridge for Strip Chart Recorder | 1 No. |
| 8. | Indication Lamp | 3 Nos. |
| 9. | On / Off Switch | 1 No. |
| 10. | Push Button | 1 No. |
| 11. | Coil For Contactors | 1 No. |
| 12. | Overload Relay for Vacuum Pump | 1 No. |
| 13. | Pneumatic Piston Type Valves | 3 Nos |
| 14. | Manual Ball Valves | 2 Nos |
| 15. | Non Return Valves | 2 Nos |
| 16. | Seal Kit For Door Cylinder | 1 Set |
- Preventive Maintenance – Electrical
- Checking of terminations and wiring
- Ensure that the power supply to the machine is switched OFF.
- Visually check all the power and control wiring and terminations in the electrical panel and for control elements mounted on the machine for any loose connection and damage.
- Check and ensure by using the screwdriver that all the wires are properly tightened at the distribution terminals inside the electrical panel and on the terminals of all the control elements.
- Checking shall be done six monthly.
- Checking and maintenance of contactors
- Switch OFF the Electrical supply to the Machine.
- Remove all the power and control wires from the contactor terminals.
- Remove dust from control panel with help of air blower.
- Remove the contactor from the panel and visually check all the contacts for the signs of pitting and deposit of carbon on the contacts.
- Clean the contacts, terminals and all the moving parts of the contactor by spraying contactor cleaner.
- Replace the contacts if found damaged / welded.
- Put back the contactor in the panel and re-terminate all the power and control wires properly to their original locations.
- Check the earthing of the panel body.
- A good earthing shall show less than 2 Volts between the Neutral Wire of the Incoming Power supply and Panel Body.
- Checking of contactors shall be done six monthly.
- Checking and lubrication of motor bearings
- Switch OFF the main Electrical Supply to the machine.
- Open the motor terminal box and remove the power connections.
- Open the foundation bolts of the motor and take it out from the Base frame.
- Open the fan cover and remove the cooling fan.
- Dismantle the end plates of the motor and take the rotor carefully out, from the stator
- Visually inspect the bearings, rotor and end plates for any sign of mechanical damage. If found any, replace / rectify the same.
- Manually rotate the bearings and check for any abnormal sound. If the bearings have worn-out replace the same, otherwise lubricate the bearings by all-purpose extreme pressure, high temperature grease.
- Reassemble the motor and re-terminate the power cable.
- Place the motor to its foundation and tighten the bolts.
- Checking of bearings shall be done once in a year.
- Checking of motor
- Check the insulation resistance of motor winding with the help of meagger.
- Check the phase continuity and winding continuity of motor with the help of tong tester.
- Physically check the motor terminal box and terminal connections.
- Check the voltage and ampere ratings of motor with the help of tong tester.
- Check the direction of rotation; it should be as per recommended direction.
- Checking shall be done after every six month.
- Checking of earth connection
- Check earthing wire and thimble for any damage. If observed any replace the same.
- Tighten the earth connection with appropriate tool.
- Checking shall be done six monthly.
- Checking of RTD Sensors
- Check all RTD sensors for any breakage/damage. If observed any, replace the respective RTD sensor.
- Checking shall be done six monthly
- Checking of PLC
- Check the PLC for blinking of LED
- Check the display
- Check the wiring contacts, if required tight the same
- Post Preventive Maintenance – Check List
- Whenever any modifications and major works are carried out to the equipment, the same shall be mentioned in the equipment history card as per the respective SOP.
- Connect the equipment main power supply and start the equipment.
- Ensure that the equipment is running smoothly, without any abnormality.
- If any abnormality is observed in the above, same will be attended in co-ordination with User department Head.
- ABBREVIATIONS:
- CRF No. : Change Request Form number
- QA : Quality Assurance
- RTD : Resistance Temperature Detector
- REFERENCES:
- Operational & Maintenance Manual of Terminal Sterilizer
- DISTRIBUTION LIST:
- SOP shall be distributed to following departments Quality Assurance, Engineering as per user request
- ANNEXURES:
- Preventive maintenance checklist and record for Terminal Sterilizer:-SOP/EN/XXXYYY
SOP For Preventive Maintenance of Terminal Sterilizer
PREVENTIVE MAINTENANCE CHECKLIST & RECORD FOR TERMINAL STERILIZER
| Equipment Name | Location | ||
| Equipment ID | Frequency |
| Things to be done: | Check List | Remarks |
| Monthly Check List | ||
| Clean the chamber drain strainer | ||
| Cleaning of chamber surface. | ||
| Checking and lubrication of door gasket. | ||
| Verification of vacuum leak test | ||
| Quarterly Check List | ||
| Check the chamber safety valve. | ||
| Check the jacket safety valve. | ||
| Checking of vacuum pump. | ||
| Checking of any leakage form pipe and pipe fittings. | ||
| Checking of pneumatic tubing and connectors. | ||
| Check the stock for recommended spare parts. | ||
| Checking of printer. | ||
| Half Yearly Check List | ||
| Checking and cleaning of steam traps. | ||
| Check and clean the spray nozzle. | ||
| Checking of termination and wiring. | ||
| Checking of contactors. | ||
| Checking of electrical motor. | ||
| Checking of earth connection. | ||
| Checking of PLC. | ||
| Checking of RTD sensors. | ||
| Yearly Check List | ||
| Replacement of vacuum pump bearings. | ||
| Replace the vacuum break filter cartridges and air filter. | ||
| Checking of motor bearings. |