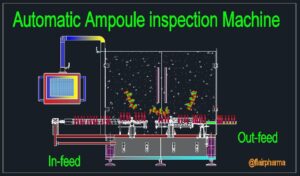
The purpose of this (Standard Operating Procedure) SOP For Preventive Maintenance of Visual Inspection Machine is to outline the steps and guidelines for performing preventive maintenance on the Visual Inspection Machine to ensure its optimal performance, minimize downtime, and maintain product quality.
SOP For Preventive Maintenance of Visual Inspection Machine
- OBJECTIVE:
- This SOP is describing the Preventive Maintenance procedure of the Ampoule and Vial Visual Inspection Machine
- SCOPE:
- This SOP is applicable for the Preventive Maintenance of Ampoule and Vial Visual Inspection Machine installed in the Production department.
- RESPONSIBILITY:
- Technician/ Operator shall be responsible for proper execution of preventive maintenance as per SOP.
- Engineering – Head shall be responsible for reviewing the SOP and for ensuring proper execution of preventive maintenance.
- ACCOUNTABILITY:
- Engineering – Head shall be accountable for proper implementation of the SOP.
- DEFINITIONS:
- Nil
- PROCEDURE:
- Preventive maintenance shall be executed as per the SOP No.: SOP/EN/XXXYYY – Execution of Preventive Maintenance.
- Ensure that the spare parts are available at the time of preventive maintenance.
- Instruction:
- Before starting the preventive maintenance activity switch off the main power supply as the electrical shock caused by touching electrical equipment directly in the electrical cabinet.
- Touch the electrical cabinet after one minute switching off the electrical main power supply; as there may exist residual high voltage.
- Preventive Maintenance – Mechanical
- Checking of fasteners
- Check that all the fasteners / mounting bolts of Ampoule and Vial visual inspection machine are properly tightened. There should not be any loose bolts.
- If found loose, tighten the bolts and nuts by using suitable spanners.
- Checking shall be done monthly.
- Cleaning of Machine
- Clean the machine surface thoroughly with IPA solution; using a soft cloth.
- Don’t use such solvents as ethanol and gasoline which may damage machine appearance.
- Cleaning of machine shall be done weekly.
- Cleaning of plastic and steel size parts
- Clean the plastic parts after exchange size parts with solvent, dry the plastic parts with clean cloth, the temperature of cleaning liquid should be less than 40 deg C.
- Cleaning of machine shall be done daily as needed.
- Check the abrasion of size parts, if necessary repair or exchange them; the checking frequency shall be after every month.
- Dismount steel size parts; clean them with proper cleaning liquid, and dry them; the checking frequency shall be after every month.
- Check the abrasion resistance of steel size parts; if necessary repair or exchange them; the checking frequency shall be after every year.
- Checking of pneumatic tubes and fittings
- Physically check the pneumatic tubes and connectors for any damage/leakage. There should not be any damage/leakage in the tubes and connectors.
- If any damage/leak is observed, replace the tube/connector.
- Checking shall be done six monthly.
- Checking of belts
- Check the timing belts of the Ampoule and Vial visual inspection machine.
- The size parts tightened by screw by qualified technician. After check the synchronization belt and support; if necessary tense the belt of exchange the size parts.
- Check the abrasion of synchronization belt wheel components; if necessary exchange the abrased parts or parts of belt.
- If found damaged / worn out, replace the same.
- Checking shall be done monthly.
- Exchange of infeed scroll
- Slacken screw 4, pull screw collet 3.
- Slacken two hex head screw bottle infeed screw, turn the hand wheel 8 anticlockwise, left axis 7 would exit leftward to separate itself from infeed segment scroll 5, then make the scroll deviate from axis line take down the scroll.
- Check the abrasion of stainless steel bearing 6, exchange the stainless steel bearing 6, if necessary.
- Exchange scroll with the same specification, mount the new size part in reverse order of dismounting.
- Exchange of infeed / out feed screw
- Slacken hand wheel 1; dismount 4Nos. hexagonal socket head caps screw 2.
- Dismount the cover 3 on the exchange 4.
- Mount new size parts in reverse order of dismounting.
- Exchange of bottle out feed scroll
- Slacken screw 3, pull screw collet 4 rightward.
- Slacken screw collets 2 and 3, make the bottle out feed scroll deviate from the axial line, pull the scroll leftward, and dismount the scroll.
- Check the abrasion of stainless steel bearing 6; exchange the stainless steel bearing 6 if necessary.
- Exchange scroll with the same specification, mount the new size part in reverse order of dismounting.
- Checking of light and camera
- Check the light for luminous intensity, if required replaces the same.
- Check the electrical wiring and contactors of the lighting.
- Check the working of camera, and check for the rejection.
- Checking shall be done after every month.
- Checking and lubrication of bearings, chains, gears and sprockets.
- Lubricate linear rail with brush, the lubrication shall be done on monthly.
- Lubricate from the top of copper bush to compression bar; lubrication shall be done on weekly.
- Check sprockets, gears, chain and cams for any damage. If found damaged, replace the same.
- Lubricate bearings, cams, gears, chain and sprocket with the help of grease gun.
- Checking shall be done after every month.
- Wipe away the lubricants on the transmission parts once in a year, clean all running parts, and lubricate them with a brush.
- Checking of printer
- Check the printer for paper alignment and printer cartridge ribbon.
- Checking shall be done after every six monthly.
- Trouble Shooting
- The trouble shooting, causes and remedy as follows;
SOP For Preventive Maintenance of Visual Inspection Machine
| Sr. No. | Trouble | Cause | Remedy |
| 1 | Bottles split at the connecting place between infeed scrolls and infeed. Bottles split at the connecting place between infeed and turret. Bottles split at the connecting place between turret and for external inspection. Bottles split at the connecting place between out feed and out feed scroll. | Poor alignment of two partsGlass split reside at connecting part. | After origin reset, adjust the parts as fewer as possible, align the centre of each part, e.g. bottles split at the connecting place between infeed; adjust infeed scroll. Remove glass split. |
| 2 | Bottle split at other parts except for connecting parts. | The width of the guide or baffle is too narrow. | Adjust guide or baffle properly. File the guide or baffle. |
| 3 | Bottles split at the connecting place Between out feed scroll and swing arm. | The origin position of swing arm has not been set. Residual drug liquid and glass splits at Connecting place. Bottles squeeze after internal inspection at out feed plate. | After origin reset, reset the origin value of swing arm. Clean the passageway and remove splits. Remove bottles. |
| 4 | Bottle falls from turret The top of bottle is abrased. | Compression bar fails to ascending and descending. Poor alignment between compression bar and center of bottles support ring. Wrong position of groove and support ring. Loudspeaker cover of pressure head does not work well. | Pull and push compression bar, remove foreign matters from the surface of compression bar. Slacken screw, after adjustment, tighten screw. Adjust the position of groove and support ring. Exchnage pressure head set. |
| 5 | Bottles do not rotate before foreign matters inspection station. | Belt skids or breaks Ampoule and vial rotating motor is broken | Tense the belt properly or exchange new belt. Exchange new servo motor. |
| 6 | Bottles fall at the connecting place between turret and for external inspection. | Compression bar is ascended too earlier | Adjust lifting cam properly. |
| 7 | The Synchronization belt breaks off. | Driven gear is overloaded because of blocking. Splits or foreign matters blocks into transmission belt. Overworking leads to break off. | Exchange rotary axis. Remove waste. Exchange belt. |
| 8 | Synchronization belt edge is abrased. | Heavy abrasion of bearing part. | Exchange belt bearing |
| 9 | The Synchronization belt gear is abrased. | Tension over demand Belt radial run out is over demand. Dust or splits fall into transmission device. | Adjust tension. Check and adjust radial run out. Remove waste. |
| 10 | Synchronization breaks off vertically. | Belt runs over guide Belt is assembled over the guide. | Adjust belt wheel, check guide. Exchange belt. |
| 11 | Noise cause by synchronization belt running. | Tension over demand. Belt is not parallel. Belt and belt gear matches well. | Adjust tense. Adjust parallelism, align two parts when assembling. Check belt and belt wheel |
- Check the stock of recommended spare parts
- Check the stock of recommended spare parts for the following spare part list
| Sr. No. | Name | Quantity (Nos.) | Material |
| 1 | Starwheel tray | SS 304 | |
| 2 | Pin bush of starwheel tray | SS 304 | |
| 3 | hold-down bolt of circular arc guide | SS 304 | |
| 4 | anti-contamination glass | Glass | |
| 5 | sleeve gasket of out feed baffle | SS 304 | |
| 6 | location sleeve of circular arc guide | SS 304 | |
| 7 | swing arm edge clapboard | POM (white) | |
| 8 | bottle support ring | SS 304 | |
| 9 | out feed screw | Groupware | |
| 10 | out feed starwheel | POM (white) | |
| 11 | infeed screw assembly | Groupware | |
| 12 | Infeed block guide | POM (white) | |
| 13 | infeed block guide direction plate | SS 304 | |
| 14 | infeed block guide lower direction plate | SS 304 | |
| 15 | infeed starwheel | POM (white) | |
| 16 | starwheel upper cover | SS 304 | |
| 17 | starwheel hold-down bolt | SS 304 | |
| 18 | infeed circular arc guide | POM (white) | |
| 19 | infeed circular arc guide lower direction plate | SS 304 | |
| 20 | turret guide direction plate | SS 304 | |
| 21 | turret guide | POM (white) | |
| 22 | out feed circular arc guide | POM (white) | |
| 23 | swing arm middle baffle | POM (white) | |
| 24 | out feed left baffle | POM (white) | |
| 25 | out feed right baffle | POM (white) |
- Preventive Maintenance – Electrical
- Checking of terminals and wiring
- Ensure that the main electrical supply to the machine is switched OFF.
- Visually check all the power and control wiring and terminals in the electrical panel and for control elements mounted on the machine for any loose connection and damage.
- Check and ensure by using the screwdriver that all the wires are properly tightened at the distribution terminals inside the electrical panel and on the terminals of all the control elements.
- Checking shall be done six monthly.
- Checking of motor
- Check the insulation resistance of motor winding with the help of meagger.
- Check the phase continuity and winding continuity of motor with the help of tong tester.
- Physically check the motor terminal box and terminal connections.
- Check the voltage drawn by motor with the help of multimeter
- Check the current drawn by motor with the help of tong tester.
- Physically check the direction of rotation; it should be as per recommended direction.
- Checking shall be done after every six month.

- Checking of PLC
- Check the PLC for blinking of LED.
- Check the display
- Check the wiring contacts, if required tight the same.
- Checking of PLC shall be done after every six month.
- Checking of contactors
- Switch OFF the Electrical supply to the Machine.
- Remove all the power and control wires from the contactor terminals
- Remove dust from the control panel with help of air blower.
- Remove the contactor from the panel and visually check all the contacts for the signs of pitting and deposit of carbon on the contacts.
- Clean the contacts, terminals and all the moving parts of the contactor by spraying contactor cleaner, replace the contacts if found damaged / welded.
- Put back the contactor in the panel and re-terminate all the power and control wires properly to their original locations.
- Check the earthing of the panel body.
- A good earthing shall show less than 2 Volts between the Neutral Wire of the Incoming Power supply and Panel Body.
- Checking of contactors shall be done six monthly.
- Post Preventive Maintenance – Check List
- Record the Preventive Maintenance details as per the Format No.: SOP/EN/XXXYYY “Preventive Maintenance Checklist & Record for Ampoule and Vial Visual Inspection Machine”.
- Whenever any modifications and major works are carried out to the equipment, the same shall be mentioned in the equipment history card as per the respective SOP.
- Connect the equipment main power supply and start the equipment.
- Ensure that the equipment is running smoothly, without any abnormality.
- If any abnormality is observed in the above, same will be attended in co-ordination with User department Head.
- ABBREVIATIONS:
- CRF No. : Change Request Form number
- QA : Quality Assurance
- LED : Light Emitting Diode
- PLC : Programmable Logical Controller
- REFERENCES:
- Ampoule and Vial machine inspection manual.
- DISTRIBUTION LIST:
- SOP shall be distributed to following departments Quality Assurance, Engineering as per user request
- ANNEXURES:
- Preventive maintenance checklist and record for : SOP/EN/XXXYYY Ampoule and Vial Visual Inspection Machine
PREVENTIVE MAINTENANCE CHECKLIST AND RECORD FOR AMPOULE AND VIAL VISUAL INSPECTION MACHINE
| Equipment Name | Location | ||
| Equipment ID | Frequency |
| Things to be done: | Check List | Remarks |
| Monthly Check List | ||
| Checking of fasteners and Mounting bolts are properly tightened. | ||
| Checking of pneumatic tubes and fittings. | ||
| Checking of light for luminous intensity. | ||
| Check for camera and rejection. | ||
| Quarterly Check List | ||
| Checking of conveyor belts. | ||
| Checking and lubrication of bearings; chains gears and sprockets. | ||
| Half Yearly Check List | ||
| Checking of printer for paper alignments and printer cartridge ribbon. | ||
| Checking of terminals and wiring. | ||
| Checking of motor. | ||
| Checking of PLC | ||
| Checking of contactors. |
You may also read about Good Laboratory Practices (GLP)


